Manage an event

Once your event is set up, registrations will start coming in. This guide outlines how to manage attendees and process manual ticket purchases on their behalf.

Event Overview

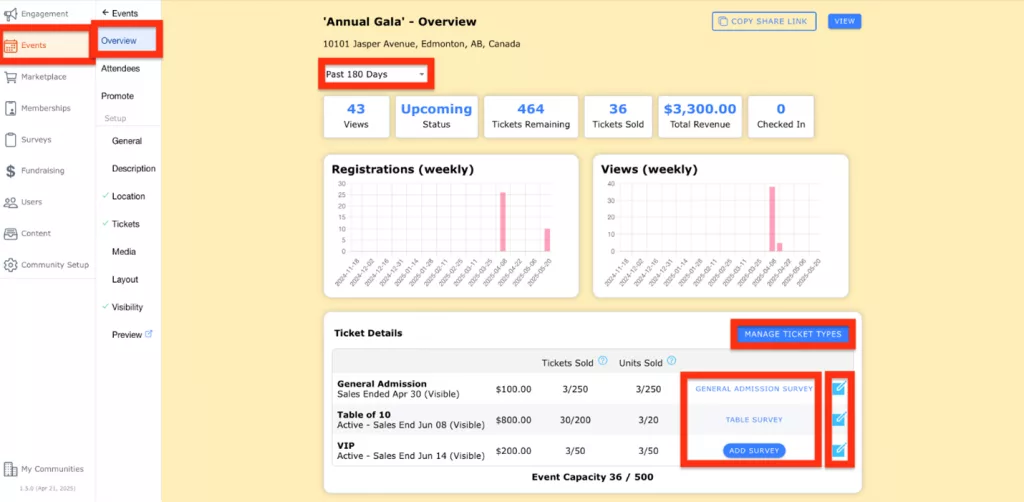
To get started, go to the Events menu, select your event, and navigate to the Overview tab. Here, you can filter event data by date range (e.g., past 7, 30, 90, 180 days, past year, all time, or a custom range).

Note: If your event is a Bundled Event or a Recurring Event, an additional dropdown will appear to select the specific occurrence you’d like to view. Be sure to choose the relevant instance to see accurate data.

Once a date range is selected, the following insights will appear:

  • Views: Total visits to your event page.
  • Status: Reflects the current phase of your event:
    • Upcoming: Event start date/time is in the future.
    • In Progress: Event has started but not yet ended.
    • Past: Event end date/time has passed.
  • Tickets Remaining: Total number of individual tickets still available. If you’re selling ticket packages that issue multiple tickets (e.g., a Table of 10), this count reflects total individual tickets remaining. For example, 3 tables of 10 = 30 tickets remaining.
  • Tickets Sold: Total number of tickets purchased (i.e., number of guests attending).
  • Total Revenue: Revenue generated from ticket sales (excluding configured taxes and surcharges).
  • Checked-In: Number of attendees who have been checked in.
  • Registrations and Views: Displayed graphically for the selected date range.

Ticket Details: This table provides a quick overview of the event’s ticket types you have configured. The data in this table will remain the same regardless of the date range you have set from above. To edit your ticket types, you can select the Manage Ticket Types button to be taken to the Tickets tab, or you can select the edit icon next to each type.
  • Ticket Name
  • Ticket Type Status: Indicates whether ticket sales are upcoming, active, or ended.
  • Visibility (Visible/Hidden)
    • Example: “Upcoming – Sales Start Jan 2 (Hidden)” means this ticket type will remain hidden from guests on your public event page until January 2.
  • Price
  • Tickets Sold
  • Units Sold
    • Note: If 1 Table of 8 has been purchased, the table will display 1 unit sold (representing one table) and 8 tickets sold (representing the individual seats at the table).
  • Linked Survey: View which survey is linked to each ticket type. If a survey is linked, click the survey name to view responses. If not, click Add Survey to connect one.
  • Event Capacity: Shows the total tickets sold out of the max capacity you set for the event.
Manage Event - Overview tab

Manage Attendees

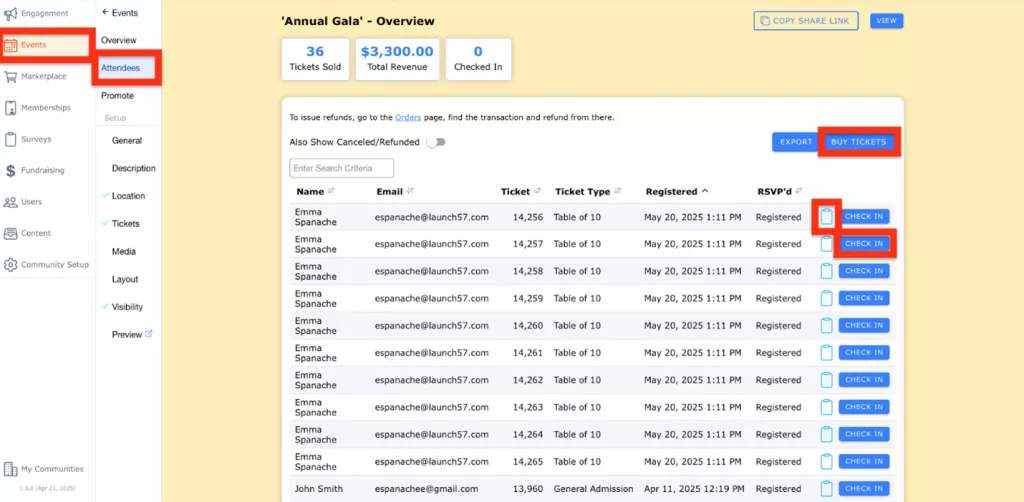
To manage your guests, navigate to the Attendees tab for your event.

Note: If your event is a Bundled Event or a Recurring Event, you’ll also see a dropdown to select the specific occurrence. This allows you to view attendee details for that specific date or event instance.

On this Attendees tab, you can view:

  • Tickets Sold: Total number of tickets purchased (i.e., number of guests attending).
  • Total Revenue: Revenue generated from ticket sales (excluding configured taxes and surcharges).
  • Checked In: Number of attendees who have been checked in.

Guest List Details:

  • Name: Attendees full name
  • Email: Attendees email address
  • Ticket: Assigned ticket number
  • Ticket Type: Purchased ticket type (e.g., General Admission, Table of 10)
  • Registered: Date and time of registration/ticket purchase
  • RSVP’d: Registration status

View and Edit Guest Survey Responses:

Each guest that has completed a survey associated with their ticket purchase will have a clipboard icon next to their RSVP status. By clicking this icon, you can view their responses. By enabling Edit Mode, you can edit their responses.

Check In Guests:

Use the Check In button next to each guest to mark them as checked in. If a guest is checked in by mistake, simply click the button again to undo it. This feature is especially useful for managing guest arrivals at the event.

Manual Ticket Purchases:

To process tickets manually (e.g., for door sales, gifted tickets, etc.):

  • Click the Buy Tickets button
  • Choose whether you’re purchasing for a Guest or Existing Member
    • If purchasing on behalf of a guest, you will need to enter their name, email, and optionally include a phone number.
  • Select the ticket(s) to be purchased
    • Only ticket types currently on sale will be available
  • Choose a Payment Method:
    • Online
    • Offline (cash, cheque, credit card, bank transfer, comped/gifted)

Complete the linked survey on behalf of the guest (if applicable).

Export Attendee Information:

If you would like to export your Attendee information as a CSV file, simply select the Export button to download this file.
Manage Event - Attendees tab

CommuniBee does not display active communities right now. If you are looking to view a specific community, you will need the community’s website URL.

Be sure to check your email to see if you received an invitation to the community; otherwise, you should contact a community admin for access.

Still stuck? Email us at support@communibee.ca