Manage auto-renew

This guide provides a comprehensive walkthrough of everything you need to know to successfully set up and manage auto-renewal for memberships in your community. It covers key requirements for enabling auto-renew, how to link memberships for renewal, tips for verifying your setup, and an overview of what happens before, during, and after the auto-renewal process for both administrators and members. 

You’ll also find troubleshooting tips, guidance on what to do if auto-renew fails, and instructions for members who wish to opt in or out of auto-renew at any time.

Auto-Renew Checklist

Prior to your current membership expiring, review the following checklist to ensure auto-renew runs smoothly. For more information on setting up auto-renew for your memberships, refer to the “Setting Up Auto-Renew for an Upcoming Membership” section below.

auto-renew checklist

Setting Up Auto-Renew for an Upcoming Membership

To ensure that members are automatically transitioned when their current membership expires, follow the steps below to set up auto-renew. This process involves creating the upcoming membership, linking it to the expiring one, ensuring the correct settings are in place, and confirming everything is live before auto-renew runs.

Important Reminder:

To enable auto-renew for a membership, the following conditions must be met:

  1. Your community’s banking is set up through Express Banking or Stripe.
  2. The membership uses a Fixed valid period, and the effective dates must be active (not expired).
  3. The membership has a set cost (it cannot be free).


Step 1: Create the Upcoming Membership

Create your upcoming membership by navigating to the Memberships tab. You can select an existing membership to Copy or click Add Membership to start fresh. For general information on setting up a membership, please refer to the instructions in the Creating Memberships Guide.

Step 2: Link the Upcoming Membership to the Expiring One

  1. Go to the Memberships
  2. Select your upcoming membership (e.g., 2025/2026).
  3. Navigate to the Auto-Renew
  4. Select the checkbox to Enable Auto-Renew.
  5. In the Renews From field, select the current membership (e.g., 2024/2025).

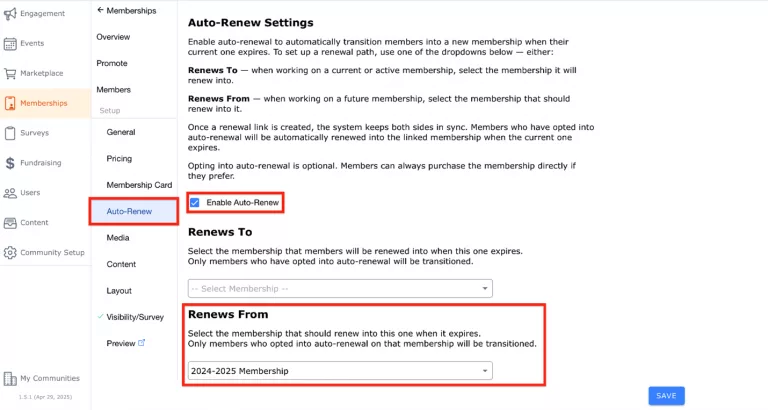
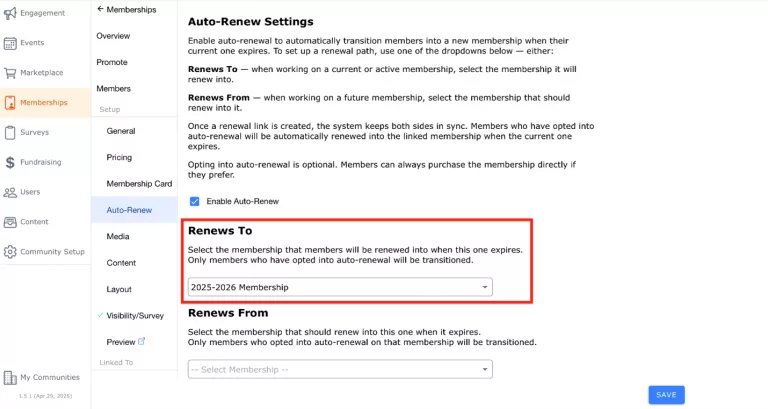
Example: If your 2024/2025 membership is set to expire soon, you’ll want to create the 2025/2026 membership in advance. Within the Auto-Renew tab of the 2025/2026 membership, ensure that auto-renew is toggled on and the Renews From field is set to 2024/2025. Once completed, the Renews To field on the 2024/2025 membership will automatically populate. The screenshots below shows how this should look. 

Step 3: Set the Upcoming Membership to ‘Live’

  1. From the Memberships tab, select the upcoming membership.
  2. Go to the Visibility/Survey
  3. Ensure the Status is set to Live.

Important Reminder: If the membership’s Status is set to Draft or Archived, auto-renew will NOT run.

Step 4: Verify Your Setup

In the Memberships table, you can confirm that:

  • Auto-renew is enabled
  • Linkages between memberships are correctly established
  • Status is set to Live/Visible
Memberships Table

Understanding the Memberships Table:

  • Membership Name: This is the name of your membership and will display on the membership card.
  • Price: The cost of the membership.
  • Enrolled: The total number of members currently enrolled in that membership.
  • Views: The number of times the membership page has been viewed.
  • Auto-Renew: Indicates whether auto-renew is enabled for the membership.
    • Displays ON if auto-renew is active.
    • Displays OFF if auto-renew is not active.
  • Renews To: Shows what the membership is set to auto-renew into, if auto-renew is enabled. Depending on your setup, you may see the following in this column:
    • Membership Name: The membership is linked and ready for auto-renewal.
    • Not Linked: No membership is linked for auto-renewal, so it will not renew automatically.
    • N/A: Displays if auto-renew is not enabled.

What Happens When Auto-Renewal is Upcoming?

What Happens When Auto-Renewal Runs?

What Happens When Auto-Renewal Runs?

If auto renew fails

How Can Members Opt-In to Auto-Renew When Purchasing a Membership?

If a membership has auto-renew enabled, during checkout, an Eligible for Auto-Renew label will appear beneath the membership name, along with a checkbox to opt in. If the user chooses to opt in, the credit card used to complete the purchase will be saved and used for future auto-renewals.

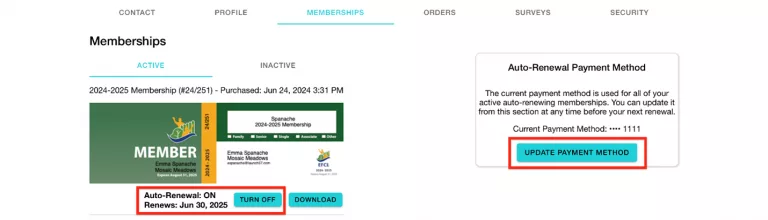
Members can update this saved card at any time by logging into their profile, navigating to the Memberships tab, and clicking the Update Payment Method button within the Auto-Renewal Payment Method section.

How Can Members Opt-In to Auto-Renew After Purchasing?

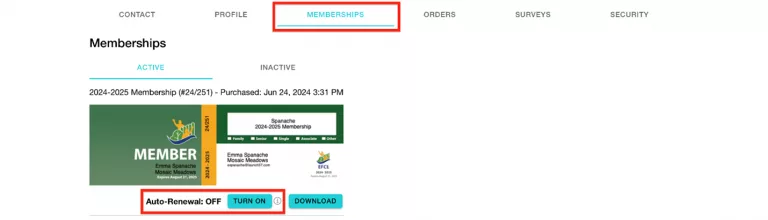
If a member did not opt in to auto-renew when initially purchasing their membership (or if auto-renew was enabled later by the community), members can opt in later by:

  • Logging into their profile and navigating to the Memberships
  • Clicking Turn On next to their active membership and pre-authorizing a credit card (used to process the upcoming auto-renewal).
  • Once completed, members can Turn Off auto-renew or update their Auto-Renewal Payment Method at any time.

Other Considerations

  1. If you no longer wish to offer auto-renew for a membership, you can disable it by navigating to the membership’s Auto-Renew tab and unchecking the Enable Auto-Renew Members who are currently opted in to auto-renew will not be notified when this is disabled. To avoid confusion, be sure to communicate this change to your members
    • Please Note: Auto-renew can only be disabled for active memberships. If a membership is expired or archived and had auto-renew enabled, it cannot be modified.
  2. Your current banking setup will be used to process auto-renewals, so if you plan to change your banking setup, you will need to turn off auto-renew on any active membership within your community.
    • If any members had previously opted into auto-renew, they will need to opt in again after you finish making banking changes.
    • If you would like to switch your banking setup from Express Banking/Stripe to Square
  3. For memberships that allow Associate Members: All associate members added at the time of membership purchase will automatically renew.
    • If their email was provided at the time of the original purchase, they will automatically be emailed their copy of the card upon the auto-renewal processes.
    • If a user needs to update their associate members, they will need to turn off auto-renew and purchase the membership manually. Upon purchasing the membership manually, the purchaser can configure their new associate members.
  •  
  •  

CommuniBee does not display active communities right now. If you are looking to view a specific community, you will need the community’s website URL.

Be sure to check your email to see if you received an invitation to the community; otherwise, you should contact a community admin for access.

Still stuck? Email us at support@communibee.ca